Pages


Showing posts with label Pistachios. Show all posts

Wednesday, September 19, 2012

Pedas for Ganesha: Indian Milk Fudge


Ganesha, the elephant-headed God, is perhaps the most famous from among the pantheon of Hindu deities.  Traditionally, Ganesha is considered the God of knowledge and is prayed to at the start of any new venture.  Every year, the birthday of Ganesha – termed Ganesh Chathurthi --  is celebrated with great pomp throughout India.  This was one of my very favorite times of the year as a child growing up in India.  The monsoons would have come to an end.  My birthday would be right around the corner.  We’d even have several days off from school.  On the morning of Ganesh Chathurthi, we would wake up early and head to the local clay artist who would have set aside a lovely clay Ganesha just for me.  We would bring home this colorful statue with great pomp – I even had a little parasol just for this occasion, so that I could hold it over Ganesha’s head as we walked him home under the scorching Indian sun.  This same ritual would be playing out all around us, as our friends and neighbors also brought home their own special Ganesha statues to install at home.  Traditionally, this would be followed by 3 to 10 days of prayer.  At the end of this period, the Ganesha statue would be taken to the local lake and allowed to dissolve.  As the clay sculpture of Ganesha dissolves, he is thought to melt away all the misfortunes of his loyal devotees.

In Bombay, in particular, Ganesh Chathurthi was celebrated with great fanfare.  In the months leading up to day, almost every temple would commission local artists to create humongous Ganesha statues – the larger the temple, the larger the statue and the more elaborate the display.  After months of seeing these temporary installations being secretively built behind burlap scaffolding, during the week of Ganesh Chathurthi, the drapes would finally be lifted and we would be allowed to wander, awestruck, through the ever-more elaborate sets.  This would all culminate with the city awarding prizes to the temples with the best displays.

Closer to home, other festivities would be brewing.  As is evident from his big belly, Ganesha is considered to be quite the gourmand, so one of the mainstays of this festival is the range of delicacies prepared by my mom and my friends' moms, alike.  
Even today, though I have moved far, far away from these scenes of my childhood, the memories of those celebrations are still fresh in my heart.  While I don’t necessarily have the time to prepare elaborate delicacies before heading out to work in the morning, I do still try to make something special in the kitchen to mark the occasion. A few months ago, I came across several recipes for microwavable Doodh peda, a type of dense Indian milk fudge.  I have since been able to adapt this recipe for just such an occasion.  So, although my ramblings about my childhood memories have been long, this recipe is anything but complicated or time-consuming.  It literally comes together in less than 10 minutes but tastes like you have been reducing milk over the stove for hours and hours.

So, in honor of today’s celebration of Ganesh Chathurthi, I give you this super simple Doodh peda or milk fudge recipe.  With its short, short ingredient list, and the ease of zapping it up in a microwave, I have a feeling that this recipe is going to make into my own fledgling list of kitchen traditions.

Microwaveable Doodh Peda or Milk Fudge (makes 2 dozen)

1 14 oz. can of sweetened condensed milk
2 C non-fat dried milk
1 stick of unsalted butter
4 pods of green cardamom, peeled and finely ground
A pinch of saffron (optional)
Nuts (optional for garnish)


Place butter in a large microwavable bowl and microwave for about a minute, until butter is melted
Stir in dried milk and condensed milk until well mixed
Place bowl on a plate, and heat in microwave at full power for 4 minutes in 1 minute intervals
After each minute, remove from microwave and stir well
Watch carefully so that the mixture doesn't bubble over while heating (but in any case, that's what the plate beneath the bowl is for)
Once mixture is thickened to a fluffy ricotta-like consistency, add cardamom and saffron.
Mix well, and spread on plate to cool for about 2 minutes
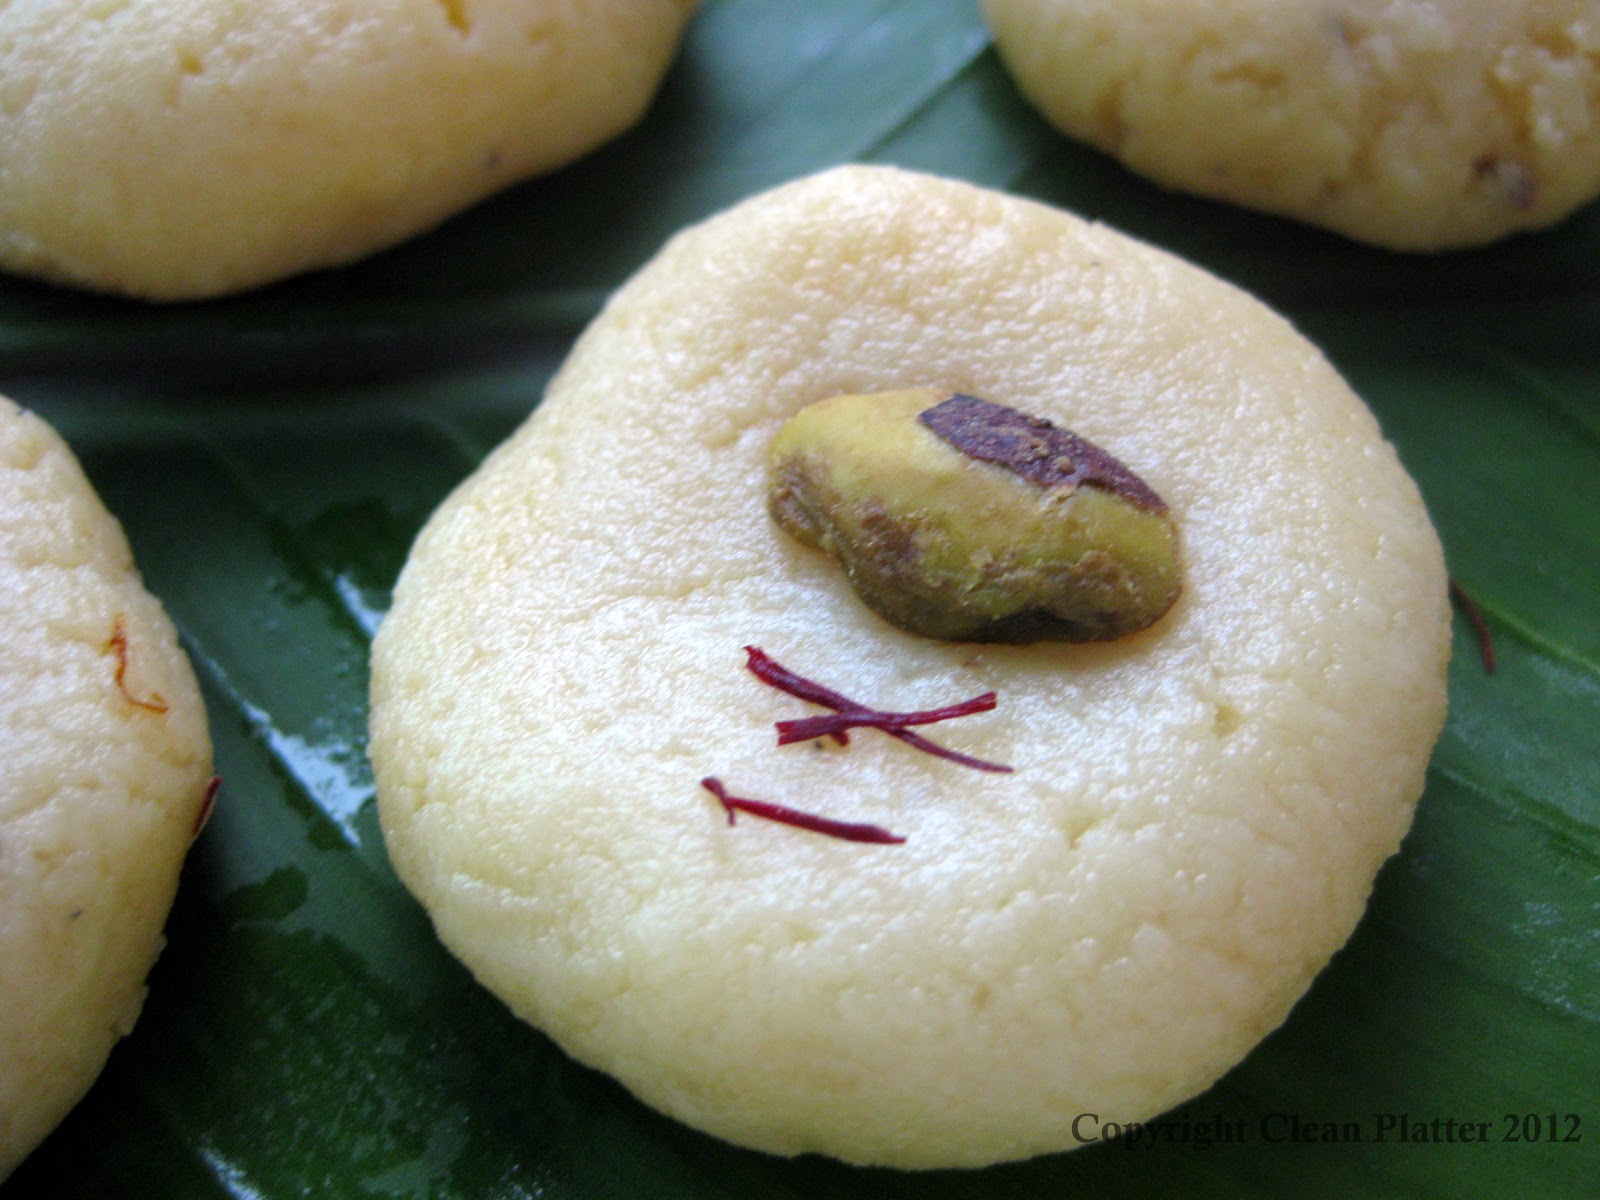
Once it's cool enough to handle, make 1 inch balls and flatten out slightly to form a thick disk
Garnish top of disk with nuts or more saffron
Store for up to a week in the fridge

Thursday, August 30, 2012

Mendiants

When life gives you lemons, you make lemonade.  So what do you do when life gives you leftover ice-cream toppings from a sundae party?  Why, you make mendiants, of course!

Perhaps I should explain.

This past weekend, we hosted our annual neighborhood ice-cream party in our garden.  The neighbors came.  We lingered over music and ice-cream sundaes and root-beer floats (that all-American thing that I still can’t stomach, but that’s a story for a different day).  But when all was said and done, we were still left with several cartons of ice-cream and tons and tons of toppings.  The ice-cream part was easy to dispatch – a small celebration at work to congratulate one of my colleagues took care of most of it.  But I was still left with a whole load of toppings including mini chocolate chips, dried coconut, salted pistachios, roasted cashews, and other yummy treats.


So, as I was taking stock of all the leftovers, it occurred to me that this would be a perfect time to make mendiants – something I’ve been wanting to do since Christmas, last year.  As I was also in the midst of planning a weekend getaway, I figured these would be a nice treat to bring along to share.


Mendiants are simply little disks of chocolate that are studded with a variety of nuts and dried fruits and allowed to set.  They are usually made by chocolatiers as a way to quickly fashion something out of leftover tempered chocolate.  Apparently, the name mendiant comes from the word mendicant, which would explain why my spellcheck infuriatingly keeps correcting my typing as I write this post.  Traditionally, mendiants showcased four different kinds of toppings representing the four different Roman Catholic monastic orders.  Inspired by the robes of the four orders, mendiants featured raisins for the Dominicans, hazelnuts for the Augustinians, dried figs for the Franciscans, and almonds for the Carmelites.  A quick search through Google did not satisfy me that the colors of the fruits and nuts really correspond to the robe colors of each of these orders, but then again, mendiants were invented far before the days of Google, so I guess I should not question it too much.


Anyhow, to get back to the kitchen, I decided to melt down the remainder of my chocolate chips and top them with various things to make my first batch of mendiants.  To make mendiants, it’s important to have a properly tempered chocolate.  One of my favorite websites, Cooking forEngineers, does a great job at explaining what tempering is and why it’s important.  But the Cliff’s Notes version is that properly tempered chocolate is essential for that unparalleled snap you hear when you bite into a quality piece of chocolate.  Now, if you go and read through the CforE site, you will see that there are many different ways to temper chocolate.  My preferred method for small scale applications like this recipe is the microwave method.  Essentially, this involves placing chocolate chips in a microwave-safe bowl, and heating at 30 second intervals and stirring in-between until about 80% of the chocolate is melted.  Follow this up with vigorous mixing of the chocolate until the unmelted chocolate melts into the already melted chocolate.  You can read all about the cool science behind this at the CforE site – this post is already too long, as it is.  I love dark chocolate, so this is pretty much the only kind I buy, but you can really make this with any kind of chocolate that you prefer.

Once you have your tempered chocolate, you are limited only by your imagination in making mendiants.  On the first batch, I went conventional with pistachios, dried coconut, golden raisins, and cashews.  But soon after, I was inspired to take it up a notch and made my second batch with dried mango, roasted cashews, toasted sesame, and a liberal pinch of sea-salt.  Both batches were delicious, and I can already see endless possibilities for future recipes.   

On that note, I would love to hear about the imaginative things you decide to put on your mendiants, but I only have one request – please, no BACON!


Mendiants

Tempered chocolate
Toppings – a variety of dried fruits and nuts
            Suggestions:
            Pistachios
            Cashews
            Dried coconut
            Raisins
            Sea salt
            Toasted sesame
            Dried figs or mangos
            A pinch of paprika

Layer a baking sheet with wax paper
Spoon tempered chocolate into 1-inch diameter disks
Before chocolate hardens, place toppings decoratively on top
Allow to set at room temperature or in the fridge
Store refrigerated up to 3 weeks in an airtight container

Friday, August 24, 2012

Nut Brittle


While I generally consider myself an adventurous cook, there are certain areas of the culinary arts that definitely intimidate me.  Therefore, scared off by burnt fingers, scalding hot sugar syrup, and pots and pans that are a nightmare to clean, I have generally steered clear of any type of candy making since my early experimenting days.  But a while ago, as I was walking down the cook’s tools aisle of my local store, my eye kept being drawn to a cute candy thermometer.  Maybe, just maybe, being armed with a gadget, would somehow help me overcome my fears of boiling syrup, I thought to myself.  Who knows, maybe candy making was my true calling, and I had been shirking from it all these years simply because I didn’t have the right tools.  At least, this is what I told  myself as I marched out of that store with a brand new candy thermometer.  
That was over a year ago.  This past week, as I was rummaging through my baking tools searching for some other impulsive purchase made and forgotten long ago, what did I stumble upon?  Yup, you guessed it – the candy thermometer!  There it was, still in its packaging, fading away inside a dark drawer.  Seized by feelings of shame at my own procrastination, I immediately ditched the original recipe that I was going to make, which is just as well, since I didn’t have any butter, which was called for in the recipe.  Instead, I decided, today would be the day to tackle my fears of boiling sugar syrup.

Having made that first bold decision, now I just had to settle on what to make.  I definitely wanted to start with something relatively easy.  And I had already bought a bunch of nuts for the other recipe that I thought I was going to be making that day.  So, with these two constraints, I settled on a nut brittle as the object of my first experiment with the candy thermometer.

After a quick search on the internet, I came across this recipe on Food and Wine.  Now, when one comes across the “Best-ever” anything, why would one search any further?  Besides, I was intrigued by the addition of salt to the brittle in this recipe, as I have always enjoyed the juxtaposition of salt and sweet.  I did feel that it lacked a little something in flavor, so I added a little bit of cardamom, which I think elevated these to something even more special.  I had both pistachio and peanuts on hand, so I used these nuts in two separate halves of the brittle.  


Since this recipe makes quite a large batch, I brought most of it to work to share with colleagues.  If the speed at which these disappeared is any indication of taste, then I think it’s safe to say that these were pretty darn tasty.  (Of course, it could also mean that scientists are particularly voracious brittle eaters, but you can see why I prefer the former interpretation.)  So, I must say, that apart from a few minor incidents involving hot syrup on delicate fingertips and bare toes, my preliminary foray into candy making was a resounding success.  It just goes to show that gadgets, even little ones like candy thermometers, do improve our lives, even if it is to just give us the confidence to try something new.

Recipe (adapted from Food and Wine)
2 cups sugar
1/2 cup water
1 stick unsalted butter
1/3 cup light corn syrup
1/2 teaspoon baking soda
12 ounces roasted salted peanuts, cashews, pistachios and/or pecans
6 green cardamom pods, peeled and finely ground
Coarse sea salt - enough to sprinkle lightly over your whole brittle

In a large saucepan, combine sugar, water, corn syrup, butter, and cardamom.  Bring to a boil**. 
Cook over moderately high heat, stirring occasionally, until the caramel is light brown and registers 300° on a candy thermometer.  This takes between 10 and 15 minutes. 
Remove from heat.  Place pan over a plate or baking tray and carefully stir in the baking soda. The mixture will bubble.
Stir in the nuts*, then immediately scrape the brittle onto a large rimmed, nonstick baking sheet.
Using the back of a large spoon, spread the brittle into a thin, even layer. Sprinkle with salt.
Let cool completely, about 30 minutes. Break the brittle into large shards.

Cook’s Notes
**Do not, and I repeat, do NOT touch the hot syrup with your fingers, lips, tongue, or really, any other body part.  It will stick to your skin and burn you, and no amount of hopping around screaming unholy words will help the sting.
*If you’d like to make two different types of nut brittles, you can simply spread the nuts thickly on two halves of your baking sheet, and pour the hot syrup over the nuts, rather than mixing the nuts into the syrup before pouring.
The brittle should store well at room temperature for up to a month, but I doubt that it will last that long.

Sunday, December 25, 2011

Christmas Fruit Cookies


Was Santa good to you this Christmas? If not, don’t despair – there’s still time to make amends. Here’s a truly delicious Christmas cookie that is sure to chase away any thoughts of Santa’s callousness from your mind. Practice making these now, so that next Christmas, you can leave out a plate of these for St.Nick, and I guarantee that he will not be able to resist making a stop in your kitchen and, naturally, rewarding you for your efforts.

Merry Christmas to you all!

You will need:

  • ½ cup confectioners' sugar
  • ¾ cup unsalted butter, softened
  • ½ teaspoon salt
  • 1 teaspoon vanilla extract
  • 1 ½ cups all-purpose flour
  • ¾ cup chopped pistachios or pecans
  • ¾ cup mixed dried fruit blend (the kind you use to make fruit cake)


To make cookies:

Beat together the sugar, butter, salt, and vanilla

Add the flour, nuts, and fruit, and stir until combined

Divide the dough in half, and shape each half into a log

Wrap the logs in plastic, then aluminum foil. Freeze for 1 hour or until you need to make the cookies (but preferably not till next Christmas)

Preheat the oven to 300°F. Lightly grease two baking sheets

Unwrap cookie logs, and cut into ¼ inch thick slices

Transfer cookies to the prepared cookie sheet, and bake for 25 minutes. They should start to firm up but not brown much, at all

Cool cookies and enjoy. They can be stored in an airtight container at room temperature for at least 2 weeks


Friday, May 20, 2011

We all scream for ice-cream!

Aaah, sweet sunshine at last! Spring arrived in Portland a while ago, but although the birds were a-chirping and the buds were a-blooming, it hadn't really felt like winter had released its cold grey hold. Until this week, that is. Finally, we have seen a few days of uninterrupted sunshine, and both I and my garden are grateful for it. With sunshine, of course, comes many things – roses, picnics, trips to the beach, Vitamin D, and best of all, ice-cream. I have a theory that no one can be angry when they're eating ice-cream. It has the power of transporting us to a happy place, at least for the few moments while we relish the creamy, cold, sweetness before it starts to melt all over our hands and clothes. (Hmmm, I hope some of you can relate to this, because otherwise, I may just be a very messy ice-cream eater.)
I've wanted to write a post about ice-cream for a long, long time, especially after a recent trip to Italy which began and ended with cones of freshly-made gelato (and was heavily punctuated with more gelato in between, of course). In retrospect, almost every phase of my life has had a particular ice-cream "experience" associated with it.

Tartufo in Rome

When I was a graduate student at the University of Wisconsin, trips to the Babcock Hall Dairy Store was de rigueur in the summers. The trick to the summer ice-cream jaunts was to get to Babcock Hall before the kindergarteners arrived en masse. Once those little ice-cream eyed kids got in line before you, you knew that it would be well past an agonizing half hour before you got your hands on any "Union Utopia" or "Badger Brownie Blast".

As an undergraduate at the University of New Hampshire, we had a similar summer routine of weekly ice-cream trips to the UNH Dairy Bar. Situated at a quaint train station, which at the time was defunct, the Dairy Bar would serve up whopping portions of cool treats, all locally made at the University.

Growing up in Japan, the preferred summer cold treat was shaved ice. Now, I know what you're thinking, shaved ice is not ice-cream. Yes, I agree. But in the humid, 90-degree plus days of summer in Kobe, Japan, melon- and pineapple-flavored shaved ice was in many ways far better than ice-cream. I have countless memories of being saved by shaved ice during the summers of my teen years: lemon-flavored ice after swimming at the local recreation center; strawberry-flavored ice with friends after a window-shopping trip; coconut-flavored ice with my dad at the summer 'matsuri'. In fact, shaved ice is so popular in Japan that even in crowded cities, the shaved ice vendor would wind through the streets with his cart, loudly advertising his goodies. This brings me to my favorite ice-cream memories of all, the ones of my childhood in Bombay.

One of the most important experiences of summer holidays as a child was the utter boredom that inevitably came after the initial frenzy of unbridled joy. As I grow older, I find that I really miss having the time to be bored. Amidst the alternating joy and boredom of summer hols, one man would appear nightly in our neighborhood, giving us kids something to look forward to. No, not Wee Willie Winkie but the "kulfiwallah", or, literally translated, the 'kulfi'-man. (If I were a better artist, I could probably draw a pretty good replica of this man, since his image seems to be etched in my memory. But as it is, my drawing skills leave much to be desired, and I'm left with just my words to paint you a picture of those summer nights, instead.)

Kulfi (recipe follows below) is a type of Indian ice-cream that is made by slow-freezing a concoction of reduced milk and sugar, flavored with pistachios, cardamom, or saffron. The kulfiwallah of our neighborhood was an old man, wrinkled with age, his skin leathery from having walked around under the Bombay sun all day long. His voice was always hoarse, and on the brink of cracking, which, in my naïveté, I imagined was a result of eating too many kulfis. His cry of "kulfi-wallah" was to be heard quite frequently during the balmy summer nights. He would be dressed in loose-fitting pants and shirt that were once white, with a pointed white cap on his head. He carried on his head a huge straw basket covered with a damp red cloth, concealing dozens of sealed metal tubes. If you had been good and your parents decided to buy you some kulfi that day, he would set down his heavy load and pull out a metal tube, open it deftly with a long knife, and coax a perfectly molded kulfi out of it onto a leaf – I don't know what kind of leaf this was, but I'm sure my dad could remind me. He would then use his long knife to quickly cut up the kulfi into bite-sized pieces and hand it over into your eager hands, just as its edges started to melt in the summer heat.

Now, I'm very aware that we generally tend to romanticize memories of our past, but looking back on these memories, I still think that life doesn't really get better than treasured moments of eating ice-cream in the summer's heat! On this note, here's my recipe for making a kulfi-like ice-cream in a home ice-cream maker. You could also freeze this in popsicle-molds for a more authentic kulfi. Enjoy.

Kulfi

Ingredients

  • 1/2 gallon milk, plus 6 T warm milk -- I use skim milk, but you can use 2% or whole fat for a creamier taste
  • 1 can of condensed milk, plus more sugar to taste
  • 1/2 teaspoon ground green cardamom seeds1/4 cup coarsely ground pistachios or almonds (optional)
  • A few strands of saffron

Method


  • Place the saffron in 2T warm milk to extract the saffron flavor.
  • Dissolve corn starch in 4 T warm milk and set aside.Place the remaining milk in heavy wok or double boiler and bring to boil over medium-high heat, stirring continuously.
  • Reduce the heat and continue stirring and boiling until the milk is reduced a bit.
  • Using a method used in making Sicilian gelato, I next add the cornstarch mixture to the boiling milk and continue boiling for ~10 minutes, or until the mixture is thickened. This step cuts down the time needed to make kulfi considerably, and also lets me use skim milk in the recipe. However, the correct way of making kulfi would be to allow the milk to boil down to ~1/4 of its original volume.
  • Add the saffron. Taste the mixture, and add more sugar if you think you need it. Remember that foods taste sweeter when they are warm than when they are cooled.
  • Freeze in ice-cream maker according to instructions, or transfer to popsicle molds (or ice-cube trays) and freeze for at least 4 hours. (If using this latter freezing methods, dip your mold in hot water for about 5 seconds before attempting to free the kulfi.)
To serve, garnish with chopped nuts and a smile.